Cable conveyor system for plastic bottle handling. Alpine conveyor accumulation for holding a lot of bottles so other machines don't shut down. Automation Ideas specializes is bottle handling conveyors and has over 30 experience in the Dairy and Custom Blowmold Industries.
Wednesday, December 7, 2011
Thursday, December 1, 2011
WEDCO 5 GALLON JERRY CAN (GAS) - The Original Jerry Can
!±8± WEDCO 5 GALLON JERRY CAN (GAS) - The Original Jerry Can

Brand : BILLET4X4 | Rate :  | Price :
Post Date : Dec 01, 2011 13:28:19 | Usually ships in 6-10 business days

| Price : Post Date : Dec 01, 2011 13:28:19 | Usually ships in 6-10 business days
Ecologically-friendly EPA compliant steel Jerry Can, 100% approved by the California Air Resources Board (C.A.R.B.). Passes all emission and spill control regulations. Features a spill-proof spout with automatic shut-off that is self-venting. Approved for use in all states. Made from galvanized steel with a specially treated internal lining the original Jerry Can design works perfectly with our HD lockable Jerry Can Holder (see below).
More Specification..!!
Tuesday, November 22, 2011
PULL 'N POUR GAS CAN SPOUT
!±8± PULL 'N POUR GAS CAN SPOUT

Rate :
| Price : | Post Date : Nov 22, 2011 14:55:27N/A
Pull 'N Pour Gas Can Spout - PULL 'N POUR GAS CAN SPOUT. Pull and twist to pour, push to store. Made of durable, high density polyethylene. Includes cap, adapter & spout assembly
Purchase Single Serving Coffee Maker Keurig Leaf Blowers Ratings Reviews
Tuesday, November 8, 2011
Blitz 12040 3/4" Metal Screw On Spout
!±8± Blitz 12040 3/4" Metal Screw On Spout

Constructed of heavy gauge, flexible metal. Designed for rugged service and to fit unleaded fuel gas tanks. Fits Blitz 5 Gallon Industrial Metal Gas Can.
More Specification..!!
Tuesday, November 1, 2011
Friday, October 21, 2011
Saturday, October 15, 2011
WEDCO JERRY CAN (Water) with CLIP-ON SPOUT
!±8± WEDCO JERRY CAN (Water) with CLIP-ON SPOUT

Brand : BILLET4X4 | Rate : | Price :
Post Date : Oct 16, 2011 04:20:22 | Usually ships in 6-10 business days
| Price : Post Date : Oct 16, 2011 04:20:22 | Usually ships in 6-10 business days
- D.O.T. Legal in all 50 states. Meets all environmental requirements. For potable (drinking) water only.
- Material: Galvanized steel with internally-treated food-grade lining & gasket.
- Dimensions: 19 inch H x 13 inch W x 6 ¾ inch D. Fits our HD lockable Jerry Can Holder.
- Fits our HD lockable Jerry Can Holder (see image). Sold Seperately
- Made in North America.
More Specification..!!
WEDCO JERRY CAN (Water) with CLIP-ON SPOUT
Monday, October 10, 2011
Thursday, October 6, 2011
Justrite 7250130 Galvanized Steel, AccuFlow Type II Red Safety Can with 1" Flexible Spout, Large ID zone, Meets OSHA & NFPA For Handling Hazardous liquids. 5 Gallon (19L) Size.
!±8±Justrite 7250130 Galvanized Steel, AccuFlow Type II Red Safety Can with 1" Flexible Spout, Large ID zone, Meets OSHA & NFPA For Handling Hazardous liquids. 5 Gallon (19L) Size.
Brand : Justrite - AccuFlowRate :
Price : $64.71
Post Date : Oct 07, 2011 00:50:59
Usually ships in 24 hours

Durable galvanized steel Type II AccuFlow safety cans offer the most convenient, safest way to store and dispense flammable liquids. Built to meet OSHA and NFPA 30, they have been independently fire tested and approved by FM, and UL. Flexible metal hose is 9" x 1” (229 x 25) long to reach small openings. U.S.A. Tank Size 5 Gallon (19L), Dimensions O.D. x H (in.): 11¾" x 17½" (298 x 445)
Tuesday, September 27, 2011
Blitz 11010 5 Gallon Steel Gas Can
!±8± Blitz 11010 5 Gallon Steel Gas Can

Rate :
| Price : $44.99 | Post Date : Sep 27, 2011 14:56:32Usually ships in 1-2 business days
Blitz 11010 5gal Jeep Can - Metal
!8!# Toro Snow Shovels Buy Now Best Buy Ovulation Test Strips
Friday, September 23, 2011
Tuesday, September 20, 2011
Saturday, September 17, 2011
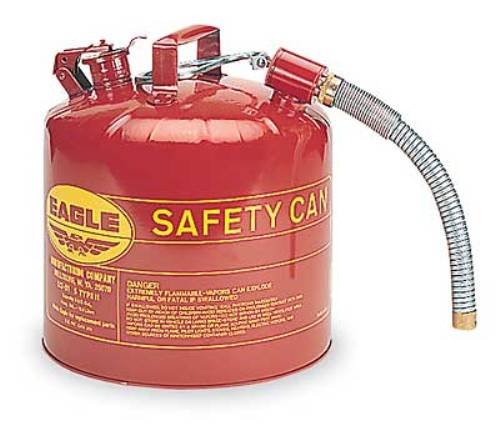
Eagle U2-51-S Type II Gas Safety Can 5-Gallon Metal Red With Flex Spout
!±8± Eagle U2-51-S Type II Gas Safety Can 5-Gallon Metal Red With Flex Spout
Brand : Eagle | Rate : | Price : $68.42
Post Date : Sep 18, 2011 04:30:16 | Usually ships in 3-4 business days
| Price : $68.42Post Date : Sep 18, 2011 04:30:16 | Usually ships in 3-4 business days
Eagle 5 Gallon Type II Safety Can with a 7/8 Spout - Model U2-51-S The only deep drawn construction safety can made with no top or side seam and a double interlock no-weld bottom seam. Spring closing lid with neoprene gasket vents at 5 psi internal pressure and Flame arrester screens in filler and dispensing spout. Meet OSHA and NFPA Code 30 requirements, FM, UL & ULC listed. Lead-free, hot-dipped 24-gauge, deep-drawn galvanized steel construction with a baked-on high gloss powder coat finish with Bright, silk-screened trilingual warning label. Deep Drawn Construction with no top or side seam.
- Eagle U2-51-S gas safety can is made with no top or side seam and a double interlock no-weld bottom seam
- Made of lead-free, hot-dipped 24-gauge, deep-drawn galvanized steel with baked-on high gloss powder coat finish
- The filler spout and flame arrestors in both openings are non-sparking brass designed for flashback protection
- Features two openings: a pressure-relief spring closing lid for filling, and an actuated pour valve with a flexible metal spout for safer controlled dispensing
- Made in the USA; 100-percent leak tested
- 100% leak tested
- Lead-free, hot-dipped 24-gauge, deep-drawn galvanized steel construction with a baked-on high gloss powder coat finish with Bright, silk-screened trilingual warning label
- Meet OSHA and NFPA Code 30 requirements, FM, UL & ULC listed
- Spring closing lid with neoprene gasket vents at 5 psi internal pressure and Flame arrester screens in filler and dispensing spout
- The only deep drawn construction safety can made with no top or side seam and a double interlock no-weld bottom seam
Coach Poppy Glam Tote Top Quality !8!# Polar Speed Sensor Magnet Order !8!# Top 10 Lag Guitars
Wednesday, September 14, 2011
Monday, September 12, 2011
Friday, September 9, 2011
Saturday, September 3, 2011
Thursday, September 1, 2011
Subscribe to:
Posts (Atom)
|
|
|
|
|
 |
 |
 |
 |
 |
 |
 |
 |